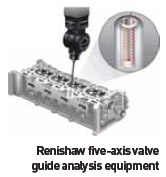
Renishaw’s Revo five-axis measurement system for co-ordinate measuring machines (CMMs) is set to change how measurements of valve seats and guides are calculated.
 The new measurement process involves two helical scans, one on the valve guide bore and the second over the valve seat area. On the guide, a single helical scan is used with a typical pitch of 0.5mm, at a scanning speed of 150mm/s, while a single helical scan is carried out on the valve seat at a finer pitch of 0.1mm at a faster scanning speed of 500mm/s. The second scan utilises Revo’s adaptive scanning capability, which allows a single scan command to cover the areas above and below the critical valve seat surfaces. The method performs exceptionally well in both repeatability and reproducibility tests, and takes as little as 20 seconds per valve.
The two measurement routines capture all necessary data about the valve seat and valve guide surfaces, which is then analysed using a utility embedded in Renishaw’s new Modus metrology software. A report is automatically generated that includes analysis of valve seat form error, runout of the seat to the guide bore axis, circularity of the seat at any specified height, form error of the cones, and circularity profile of the guide cylinder at any specified height.


