The latest measurement innovations for assembly line environments and an assessment of whether ‘quality at any cost’ still holds true
Not so long ago, the remit for production engineers was to remove as much cost as possible from assembly line operations, yet measurement processes frequently escaped this directive, largely through fear of compromising the quality of the model or brand.
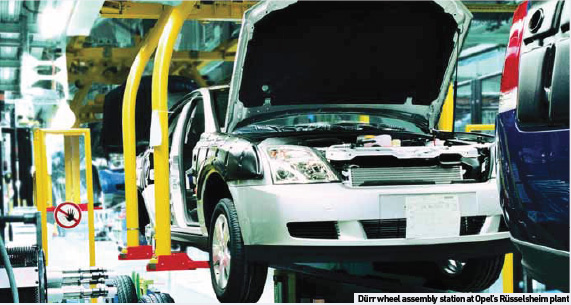
Move forward a decade and most, if not all measurement procedures on the modern assembly line have been reviewed many times over, with the enabling factor being technology. The argument about whether quality assurance adds value to a product will rage until the end of time, but what is certain is that no one wants measurement to take longer than is absolutely necessary. Aware of the demands, metrology equipment manufacturers have made it their priority to offer solutions that are faster, more capable and more cost effective. One such example is x-3Dprofile, Dürr’s new wheel geometry measuring system. This is a classic case highlighting the trend in which technology, based on stereo photogrammetry and laser arrays, is rapidly overtaking yesterday’s laser triangulation. Since its launch, Dürr’s x-3Dprofile wheel geometry measuring system has been integrated into 16 wheel-alignment test stands. The breakthrough came when Dürr Assembly Products had an order to upgrade three test stands and return the fully reconditioned machines to the Audi A4 production line at Ingolstadt within a short time. Using the new technology, Dürr had no difficulty in handling the mix of Audi models, from the A4 (saloon and Avant models), through to the Audi A5 Coupé and the Audi Q5 SUV.
The advantages of x-3Dprofile really come to the fore when a variety of different models are involved. The new system offers not only a wide measuring range, but also cuts the adjustment and parameter setting work involved so that there is a reduction in required commissioning time. A further benefit is that the system is not affected by general lighting, allowing it to be operated in bright, ergonomically-favourable working environments.
Measuring suitable for varied model mixes
“The x-3Dprofile sensor’s wide measuring range makes it particularly suitable for model mixes that are extreme in terms of differences in track width, ride height and tyre size. This is exactly what we require of such systems,” explains Philipp Scheppelmann, who is the graduate engineer responsible for wheel alignment in the assembly planning department at Audi Ingolstadt.
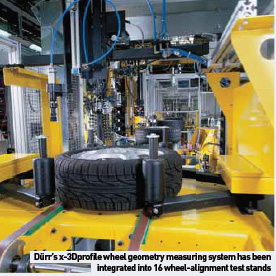 The x-3Dprofile is also in use on a repair line test stand and on a pre-series test stand used by R&D at Ingolstadt. This broad application base for use of the new technology underlines its suitability for volume production. The number of sensors required on each wheel alignment machine has been reduced from 16 to four. This means less complexity and less chance of error. Depending on individual applications, an x-3Dprofile sensor can replace up to seven classic triangulation sensors. Unlike other sensors, which project multi-coloured bands onto the wheel, x-3Dprofile uses stereo photogrammetry and laser arrays to measure toe and camber angles. During the measuring process, the Dürr technology uses laser lines of an intensity several times greater than that of a standard light to illuminate the tyre. These laser lines form a 2D dot matrix and can be switched individually.
Using the x-3Dprofile sensor to offer a new way of measuring ride height is yet another highlight. Here, an LED array projects light on to the edge of the wheelarch of the vehicle so that the illuminated contour can be measured by stereo photogrammetry to determine the lowest point of the wheelarch edge. The new system is to become a Dürr Assembly Products standard – Renault Alpine (France) and Aston Martin are working with the new system on passenger cars, as is Audi. Khodro of Iran will also use x-3Dprofile, on a wheelalignment test stand for buses. The former systems will be offered as special solutions on request, though prior to placing orders, customers will be offered the opportunity to see the advantages of x-3Dprofile for themselves by carrying out comparative measuring tests at the Dürr Assembly Products facility at Püttlingen.
Notifying staff when tolerances are out
Ultimately, as with all high-volume production, automated operations are key to measurement and testing as the cost of discovering a problem hours or even minutes after it first occurs can be considerable. An example of intercepting a problem before it could halt production was at the former DaimlerChrysler Jeep assembly plant in Toledo, where the company was experiencing a punching problem in an underbody station. The problem had affected only a small number of parts, but had it not been quickly identified, extensive manual rework would have been required and production would have been lost because of short-shifting.
The solution arrived in the form of Perceptron’s AutoGauge system, which had been introduced to perform checks on eight critical holes located on the underbody sub-assembly. An alarm limit was set to stop production and notify plant personnel when measurement values were out of tolerance and as a result, the problem was quickly identified. AutoGauge alerted the team to the problem and on inspection, it was found that the pierce holes in question were not there. Closer inspection of the pierce unit revealed that a punch head had broken and had to be replaced.
This kind of early warning system limits the amount of rework required to fix the problem and prevents any loss ofthroughput. Had the missing pierce not been discovered until later in the production process, the system would have filled with rework jobs and resulted in significant production loss – potentially costing the company millions of dollars. The thousands of fabricated parts that go into every vehicle chassis and body assembly unavoidably result in some level of tolerance build-up that can hinder successful assembly. Take robot-guided assembly of doors, bonnets and roofs, for example. Here, HPFIT software from Inos is ensuring these operations are fast and highly precise at assembly plants around the world.
HPFIT doesn’t simply check a robot’s positioning to achieve optimal gap and flush tolerances. Instead, it requires complete process information, in the case of closures, the screwing or welding of the hinges can influence final production. The HPFIT system also features gripper sensors that allow for variations in the way that the door is presented, the position of the door in the gripper in relation to the position of the car body on the conveyor. Conventional systems that rely on extra steel frames to accommodate static sensors are no longer required saving on capital investment, while HPFIT also allows different car models to be managed with a single gripper. There is little doubt that geometrical tolerances on assembled bodies are getting tighter: new welding techniques create seam welds that are nearly invisible, while at the same time customers are highly sensitive to the appearance of gaps.
Comparing absolute data with CAD data
In-line measurements have a clear advantage in that every body on the assembly line is inspected. This, however, also requires a flexible solution as multiple body variants are often assembled on the same production line. Implementing technology such as K-Scan from Metris offers some distinct advantages, such as the provision of absolute measurement data that can be compared directly to CAD data. Absolute measurements also eliminate the need for a reference body to ’calibrate’ the set-up , while laser scanning provides more comprehensive information than the single values derived from ’point and shoot’ measurements.
Metris also offers K-Robot, an industrial robot equipped with a closed, metrology-driven motion feedback loop that accurately moves a digital laser scanner around the part to be inspected. In this way, it transforms industrial robots into highly accurate and efficient in-line metrology solutions. Renault in France agrees: “Robotised laser scanning facilitates the inspection of complex shapes that increasingly characterise today’s vehicle bodies,” says Thomas Dalançon, specialist in measurement innovation at Renault. “It is much more difficult to measure these shapes using conventional touch sensor technology. Based on measurements performed on vehicle doors, K-Robot is showing potential to compress inspection time by approximately 20 per cent, compared with CMM touch sensor measurements.” Besides inspection routines, metrology can be deployed to increase the accuracy of automated assembly tasks, such as part positioning and drilling. Similar to K-Robot, Metris Adaptive Robot Control features optical Metris K-Series metrology technology that increases the capability of industrial robots to meet accurate process specifications and achieves a greater level of automated part manipulation.
Higher accuracy levels
The K-Series’s optical CMM dynamically tracks infrared markers on the robot and/or the part, and continuously adjusts robot motion using a closed data feedback loop. This set-up makes cyclical robot calibration obsolete and eliminates the influence of robot warm-up, drift and backlash, resulting in accuracy levels that are 10 times higher than without dynamic metrology monitoring/ correction. Adaptive Robot Control saves considerable money, as robots intrinsically offering comparative accuracy require investments that are many times higher. Another assembly challenge that has provided engineers with headaches for decades, particularly on engine lines, is securing fasteners. All fasteners that rely on a thread to secure a joint over the entire vehicle lifetime require pre-determined torque levels.
To help guarantee the right outcome time after time, ASI Datamyte has developed a reliable, error-proof residual torque measurement system called LightStar. LightStar torque and angle wrenches are said to eliminate false readings, increase accuracy and reduce variability of residual torque measurement.
The time between fastener motion and operator response is a key driver of variability when measuring peak torque. This is why assessing residual torque by measuring peak torque is subject to operator error that induces false high and false low readings, as well as much higher variability than measured installed torque.
These false high and low readings are a result of the operator’s perception of when the fastener begins to turn. High readings are caused by too much operator followthrough, or overshoot, after fastener motion begins. Low readings are caused by an operator releasing the wrench before fastener thread motion begins, because of the operator mistaking a bump or a jar for fastener motion. LightStar wrenches, in conjunction with ASI DataMyte data collectors and software, measure torque at angle using new technology. A solid-state gyro in the torque wrench head is used to capture torque only when the fastener actually turns. The instrumentation and logic built into the data collector differentiates between wind-up – the flex or twisting of the workpiece, drive, socket and extension – and actual fastener motion.
A multi-coloured LED in the wrench head instantly notifies the operator of measurement status when the wrench is connected to an ASI DataMyte data collector. This notification happens as soon as fastener motion begins and lets the operator know that the measurement has been taken. This means that costly recalls are avoided and that compliance with regulatory requirements and safety standards is assured. Labour costs are also reduced because it takes less time to take the same number of measurements.
So how does it work? The data collector includes three new algorithms that let the user customise applications for all types of joint mechanics. These algorithms are: angle restart, angle breakaway and torque at angle. All require a rotationally stable workpiece. Angle restart captures torque as the fastener starts moving after overcoming static friction. This form of measurement is particularly useful when the effects of corrosion or locking adhesives need to be removed to more accurately assess clamp load.
Angle breakaway captures the torque needed to set a fastener in motion. This is often referred to as ‘torque to turn’. Unlike torque/time breakaway, angle-based breakaway is not subject to variations in operator technique. Torque at angle captures torque at a user-defined amount of detected rotation, for example, 2° past a torque threshold. This measurement strategy is useful in special applications where there is predictable bolt head or work-piece rotation before thread rotation.
The algorithms in the data collector convert a torque transducer’s analogue signal to a digital value that represents the force applied. The LCD panel on the collector displays a torque curve plot for the joint being measured. The algorithm selects the desired point, or an innovative ‘pick-a-point’ feature lets any point be selected from the curve as the data value. Software-based systems such as these are increasingly prevalent in assembly line environments, offering the added benefit of complete, automated traceability. Innovative software, paired with portable CMMs, is a growing trend in automotive environments. While use of these systems might be limited to prototype and pre-production runs at volume manufacturers, niche marques such as Lotus enjoy the considerable benefits of this technology.
At the company’s Hethel assembly plant, a Faro portable CMM is used in tandem with Delcam’s PowerInspect software. This combination ensures that inspection reports can be produced automatically, in pictorial, graphical and tabulated data formats, either to recognised international standards or in a customer-specified format. By giving real time results in an easy-to-understand format, PowerInspect allows problems to be identified earlier and corrected at lower cost. “With PowerInspect, we have the ability to check a complete body side of a car within 10 minutes,“ says Chris Balls, Engineering Workshop Supervisor at Lotus. “This includes the time taken to set up the Faro arm alongside the production line, to set the datum, and to check selected points and sections on each of the individual panels that make up the complete body side. This represents a huge improvement on our previous methods.”
Verifying sub-assembly builds
The portability of the Faro arm/ PowerInspect combination is another big advantage. “We also use PowerInspect to verify the build of sub-assemblies at the point of production. For example, with a door, this includes the positions of brackets, hinge points, glass channels and door handles. This is achieved by loading the different CAD files into PowerInspect as the door is assembled. Again, any problems are highlighted instantly, allowin solutions to be implemented mu faster,” states Balls.
According to Delcam’s marke manager, Peter Dickin, the latest PowerInspect provides extra support for this type of inspection. “It allows multiple alignments to be used when checking assemblies of parts,” says Dickin. “This enables the user to discover if the error is in an individual component within the assembly and if so, in which one. Alternatively, it will show if the problem has resulted from an inaccuracy in the way in which the parts have been fitted together.”
The cost of quality may be reducing in real terms as new innovations come to market to speed or simplify measurement processes. However, the cost of failure remains as high as ever, particularly on automotive assembly lines, which means a ‘no compromise’ culture must remain wherever quality is a priority.


