The ‘art’ of measurement is portrayed nowhere so vividly than in automotive applications. With freeform body surfaces and complex, multi-featured engine components, the challenge for engineers is to get the best from metrology equipment to help develop and optimise manufacturing processes.
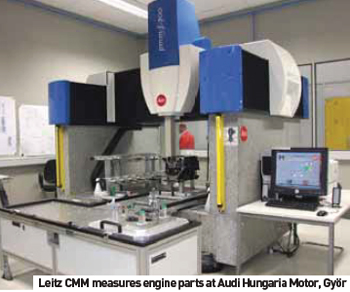
Few can provide a more comprehensive example of best-practice quality control than Audi Hungaria Motor in Gyõr, Hungary. Here, the quality assurance of its engines is, amongst other equipment, measured on a total of 19 Leitz co-ordinate measuring machines (CMMs), the most recent addition to which is a Leitz Reference CMM with integrated rotary table.
All of the main engine parts are produced here, including engine blocks, cylinder heads, piston rods, crankshafts and camshafts. With regards to the latter, two Leitz Reference CMMs are used for measuring camshafts, where checked gearing parameters include pitches, flank direction and profile form. Cam angles, freeform surfaces and bearing diameters are also measured as part of the process.
But this is just the tip of the iceberg. Audi Hungaria Motor produces nearly two million engines a year (around 400 variants) for different Audi and VW models. To cope with the quality control demands, the Leitz CMMs toil for seven days a week across three shifts.
The latest Reference with integrated rotary table enables complex inspection of the company’s new AVS camshaft components and has the potential to accommodate parts with large measuring volumes. Elsewhere on site, a large Leitz PMM-F measures components for the ‘Global’ engine, which comprises series production analysis from cylinder bores. Previously, this extremely complex task was conducted using special form measuring machines, a process that took an hour to complete. Using powertrain analysis software from Quindos and the scanning features of the PMM-F, the same results can now be achieved in 30 minutes.
Like Leitz and Quindos, DEA is a brand of Hexagon Metrology, a company boasting a rich association with the automotive sector. A recent case in point can be witnessed at the Italdesign Giugiaro plant, located on the outskirts of Turin, Italy, where a new dual-arm horizontal DEA Bravo HP 60.16.25 measuring machine has been installed in the company’s metrology lab.
“We required a horizontal dual-arm measuring machine equipped with continuous wrists that allow fast and accurate measurement even underneath the car chassis and inside the assembled car body,” explains metrology room manager, Paolo Bocca. “We go from sketches on paper to virtual models, from resin maquettes to the first real prototypes, to arrive at pre-series. The new DEA CMM is placed at the end of this path. Its task is to contribute with dimensional analysis to establish the actions required to transform a style idea into a manufacturable product. We expect it to optimise the process, increase data production and reduce the measurement time required.”
Aston Martin, headquartered in Gaydon, UK, has similar hopes for its recently- established design studio, where ITP measuring technology takes pride of place. Here, four multifunction ITP Group cast-iron plates with vehicle lifts enable designers to work on the models ergonomically. Three plates feature ITP twin column HA180 M manual styling systems, which can measure any point on th vehicle, down to a resolution of 0.01mm. The fourth cast-iron plate features an ITP twin-column HA180 CNC three-axis milling system to mill and verify full-size clay models. Finally, an ITP HA180 side rig system has also been installed for the verification of individual parts or scale model development.
 New CMM development for automotive applications is often restricted to software or probing enhancements, but Carl Zeiss is offering something genuinely different with its new DuraMax model, specifically for gear measurement tasks. “This enables us to fulfil the requests of many customers and introduce gear wheel measuring technology with small machines that can be used as close to production as possible,” says Alexander Dollansky, Product Manager at Carl Zeiss Industrial Metrology.
DuraMax Gear is a CNC all-rounder that, when combined with CAD-based Calypso and Gear Pro involute measuring software, is able to complete all jobs in daily gear measurement, including straight and slant-tooth spur gears and splines.
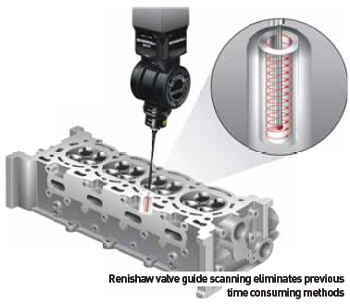
Arguably the big mover in CMM innovation in recent years is Renishaw’s Revo five-axis measuring technology, and this has significant overtones for the automotive sector in general. For instance, despite their significant influence on engine efficiency and exhaust emissions, the measurement of valve seats and guides has traditionally been so challenging and time-consuming that most methods used are often a compromise and do not allow for responsive process feedback. However, using the Revo system for CMMs, this is changing.
Revo allows very fast collection of large amounts of data, from which the analysis parameters for both the valve seat and the valve guide features can be calculated. The method performs exceptionally well in both repeatability and reproducibility tests, and takes as little as 20 seconds per valve, according to Renishaw.
The new measurement process involves two helical scans, one on the valve guide bore and the second over the valve seat area. On the guide a single helical scan is used with a typical pitch of 0.5mm, at a scanning speed of 150mm/s, while for the seat, a single helical scan is carried out at a finer pitch of 0.1mm and a faster scanning speed of 500mm/s.
The two measurement routines capture all necessary data about the valve seat and valve guide surfaces, which is then analysed within a utility embedded in Renishaw’s new Modus metrology software. A report is generated automatically that includes analysis of valve seat form error, run-out of the seat to the guide-bore axis, circularity of the seat at any specified height, form error of the cones, and circularity profile of the guide cylinder at any specified height.
 Another interesting and increasingly popular metrology concept is the use of a robot to manipulate a probe or scanning head. Exploiting this idea to good effect is the press shop at BMW’s Dingolfing plant, which relies on automated optical 3D co-ordinate measuring technology from GOM to help measure parts for the company’s high-end 5, 6 and 7 Series vehicles.
The robotic inspection cell is positioned alongside Europe’s biggest suction transfer sheet metal press with a ram force of 9,500 tonnes. The cell enables BMW to inspect sheet metal components from small lock plates to complete side panels – across three shifts. Six different components can be mounted at once.
The robot inspection cell is also used during the product development process. In fact, the automated GOM solution has already been used to support the launch of series production and manufacturing for over six vehicle types.
This brings several advantages, including fast root cause analysis, targeted correction measures and analysis of impact correction and its effect on adjacent areas. Optical scanning is increasing in uptake as users look to gain speed advantages over tactile methods. Among the manufacturers convinced of the benefits is Gestamp Polska, a Wrzesnia-based bodyshop that supplies Caddy van body shells to VW Nutzfahrzeuge in Poznan. Gestamp is using an ABIS II surface inspection system from Steinbichler for quality control and documentation.
For manual inspection using a grinding stone and subsequent rating within the VW classification scheme (for a Caddy sidewall frame, for example) the quality engineer needed approximately 60 minutes. With the new ABIS II offline unit, the surface quality inspection is completed in no more than three minutes.
VW Nutzfahrzeuge placed high value on the holistic approach of surface quality inspection throughout the process chain. For example, the Caddy sliding doors were first tested as single parts, then as assembled parts and, finally, after KTL (cathodic dip primer) coating. Through this internal process optimisation, any possible influencing factors on surface quality could be revealed at an early stage in the production process.
One metrology trend impossible to ignore is the growing number of manufacturers switching to portable, rather than conventional fixed-bed CMM technology. At the Dresden, Germany plant of VW, where its premium Phaeton model is assembled, dedication to quality perfection manifests itself in many ways. For example, in the attention paid to the width of the gap between individual sheet metal segments, to the way headlamp elements seamlessly hug the fender, or the ‘thump’ a door makes when it shuts. All of these are subtle yet perceptive indicators of the car’s quality, even to nontechnical people.
In December 2010, the UK’s National Physical Laboratory’s FreeForm Centre staged its annual FreeForm Conference at the TechnoCentre within Coventry University. The key theme was how Jaguar Land Rover uses the latest freeform measurement techniques to improve the launch process within its construction of body parts for cars. Items that are freeform are unconventional in shape or design, especially in being asymmetrical and irregular, but with a flowing outline. Traditionally such forms have proved difficult to measure; therefore when they are mass-produced for manufacturing, it can be difficult to provide traceability for freeform shapes.
As a car manufacturer, Jaguar Land Rover is finding that point measurement is not sufficient in order to understand fully the complex interfaces between panels within the body shell.
As a result, the company is moving increasingly to scanning technologies and freeform measurement techniques in order to achieve best quality for the customer. This type of analysis also allows the complex build up of panels and assemblies to be done quickly within the ‘virtual world’, where dies and panels could be on opposite sides of the globe. While Jaguar Land Rover has been using scanning for some time, its work with NPL has helped the company increase its understanding of the measurement efficiencies of freeform measurement.
The metrology department at the Dresden plant, under the guidance of Frank Herold, is in charge of assuring the perfect fit. In the past, the department relied on a large-scale measurement facility with conventional CMMs, but today this has all changed.
“We wanted to implement a versatile measurement system that would allow us to cut the time needed to inspect a finished vehicle,” says Herold. “Thanks to our migration to two Leica T-Probe systems, we were able to cut the time needed to inspect a vehicle by at least four hours.
Furthermore, the entire time and effort normally invested in the maintenance and alignment of setting masters became history. What we have effectively done is cut the end inspection times in half.”
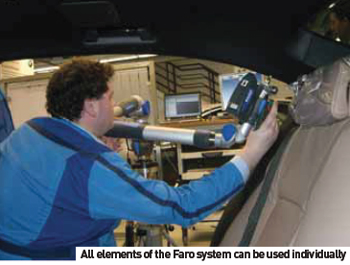
Faro is another technology supplier with a vested interest in portable CMMs. The company says its Track ScanArm is being used at the BMW plants in Dingolfing and Regensburg (both in Germany). Here, systems were required for recording tactile points and surfaces irrespective of location, as well as wireless transfer rather than via a tool. Calibration was therefore not to be conducted by means of reference marks, as this represents an uncertainty factor, for example because of the moving parts.
The objective was clearly non-contact wireless transfer, and Faro’s Track ScanArm satisfied the requirement profile. This innovative kit combines the Faro Laser Tracker, the seven-axis FaroArm Quantum with a range of 2.4m, and the Laser Line Probe V3 scanner. The package is completed by Polyworks software.
The range of tasks covered is extensive: the focus is on product qualification during the product development stage, or pilot production, in order to get supplier parts up to series production standard.
In a new development in this technology sector, Verisurf has unveiled the GagePlate system – an innovation that expands the capabilities of the Master3DGage portable rapid 3D inspection solution. Master3DGage integrates a six-axis portable CMM with Verisurf ’s 3D model-based GD&T inspection software. This solution delivers an automated digital process to inspect directly to CAD models anywhere on the shop floor and is as accurate as any portable CMM arm, says Verisurf. The GagePlate system automates realignment of the Master3DGage around large parts under inspection, while referencing a single co-ordinate system.
 Retaining the Verisurf theme, Nikon Metrology has joined forces with Verisurf Software to make it possible for manufacturers to drive all Nikon Metrology portable metrology devices from Verisurf ’s common software platform. Supported Nikon Metrology devices include the Laser Radar, K-Series optical CMMs configured with scanners and probes, MCA II articulated arm configured with scanners and probes, and the iGPS.
So what of the future? Well, many are pointing to industrial CT (computed tomography) scanning as the next big thing. CT scanning is a process that uses x-ray equipment to produce 3D representations of components both externally and internally. Some of its key uses are flaw detection, failure analysis, assembly analysis and reverse engineering applications. Suppliers such as Zeiss and Wenzel already offer CT scanners while others are sure to follow as interest continues to rise.


