Faster measurement times and precise data quality are the result of GOM’s new generation of 3D scanners
 Measurement technology is currently in a state of transformation. Many of today’s metrology workflows are obsolete for modern production metrology. In the past, the typical metrology setup was a CMM integrated in a measurement room and only sub-samples of the object’s geometry were inspected. But today, the demands placed on measurement technology have risen significantly. If quality assurance is to be seen an integral part of processes then measurement technology must be relocated to production areas where environmental conditions are continuously changing and hidden process errors can happen.
Industrial metrology must lead to faster and more efficient processes; high throughput and reduced rework have to be ensured. The most efficient way to identify, analyse and fix production processes, as well as quality problems, is by using a 3D model as a digital twin of the real part in production. This, however, is only possible when the complete information of the part is needed.

3D measuring data in automotive manufacturing
In order to meet the requirements for full-field data, the automotive industry and, consequently, the entire sheet metal forming industry, relies on 3D metrology within the entire manufacturing process chain. Optical 3D coordinate measuring machines capture more detailed and easier-to-interpret quality information about an object in significantly shorter measuring times than traditional CMMs. A significant advantage of optical measuring machines is full-field evaluation and visualisation in colour-coded deviation plots, meaning problematic areas of parts can be identified intuitively and respective corrections can be derived.
Process optimisation in press shops and production sites
GOM provides metrology solutions for every step in automotive manufacturing, and for tool designers, ATOS delivers full-field geometries of tools. Designers also benefit from being able to archive final modifications so that the perfect tool can be reproduced any time. This forms the base for surface reconstructions in CAD.
In the Try-Out phase, full-field inspection with ATOS technology ensures the part geometry by checking trim, spring-back, hole patterns and material thickness, so problematic areas are located at a glance. When it comes to First Article Inspection, ATOS delivers full-field deviations to CAD, GD&T inspections, and provides complete inspection reports. The integration into existing processes is easy and due to the trend analysis function tool wear is made visible at an early stage.
In the press shop, where the focus is on production quality control, all inspection features and dimensions must be captured in a very short time. With the ATOS ScanBox component production with tight specifications can be controlled to guarantee problem-free final assembly and produce a high-quality product.
The ATOS ScanBox is proven in the automated inspection of metal sheets as well as body-in-white analysis, and component errors and surface defects are detected quickly. Components with bulges, dents, scratches or weld spatters are avoided. The high quality of the ATOS measuring results allows the digital assembly of individually measured parts. Measuring results from press shop, bodyshop or suppliers can be merged centrally by the manufacturer. Prior to physical assembly, information on gap and flush or functional dimensions can be evaluated.
Full-field data is key for:• Time-efficient troubleshooting• Understanding the interaction of parts• Inspect and classify surface defects on sheet metal components and tools• Statistical process control (SPC)• Virtual assembly.
Getting faster with the fifth generation: ATOS 5 | ATOS 5X
In all areas of automotive manufacturing, it is important that measurement results are available quickly and as precisely as possible. This is why GOM is constantly working on speed and accuracy, and now presents the latest sensor generation. Fast measurement times and precise data quality form the centre of the new generation of 3D scanners from GOM, which fit perfectly the requirements in press, tool and body shops. Process acceleration and increased process reliability were at the forefront of the development of the latest systems.
ATOS 5 and ATOS 5X are two new high-speed sensors in the ATOS family. The robust sensors are fast and precise. The Blue Light Equalizer is a component that was especially developed for the light source. The result of the new technology is an ultra-powerful light source that enables the use of large measuring volumes.
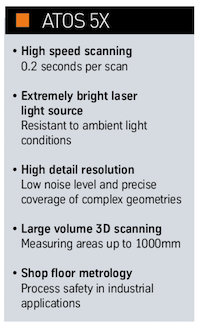 The bright light source of the ATOS 5 is based on blue LED light. ATOS 5X uses the integrated Laser Light Compressor to generate ultra-bright light. This allows for measuring areas of up to 1,000mm with acquisition times of 0.2 seconds are reached and, as a result, both measuring systems achieve high-precision data in a short measuring time. The GOM data quality is particularly evident in the detail sharpness of the 3D models, for example, in the precise display of smallest details, rib structures, narrow radii and hemmed edges.
ATOS 5X for automotive car body inspection
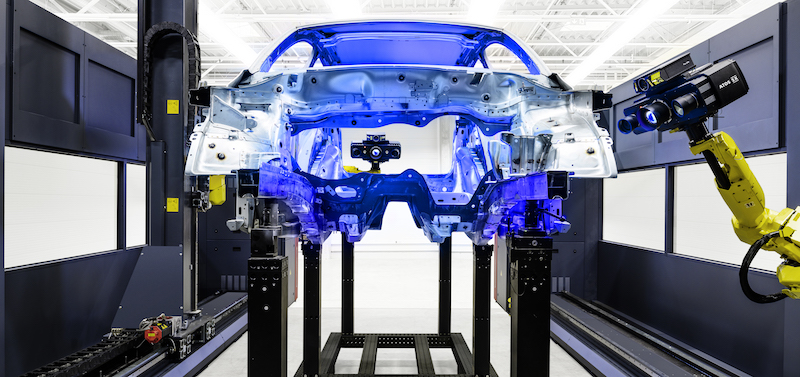
The systems reach their maximum efficiency in automated applications, such as the ATOS ScanBox series. For example, an ATOS 5X in the ATOS ScanBox Series 8 accelerates a process by a factor of four when measuring and inspecting large and complex objects. The automated measurement of a complete car body, both outside and inside, typically takes 30 minutes with ATOS 5X – including the precise coverage of complex geometries. The system enables the highest possible throughput, with the main application areas in Meisterbock and Cubing, inspection of complete vehicles and quality control in body manufacturing. ATOS 5X delivers full-field data for comprehensive process and quality control of hang-on parts, side panels and complete car bodies.
Taking measurement technology to a new level
New metrology workflows for modern production facilities benefit from the power of digital twins to identify, analyse and fix the production process. It is obvious that the future of metrology must be full-surface. It is no longer just a question of improving product quality, but of improving the entire production process. No more drawings will be needed since each produced component will be measured completely in 3D. Ultimately, ATOS technology will provide enhanced levels of information that will, in turn, enable faster error correction. Thus, component errors will automatically be measured and corrected during the manufacturing process.
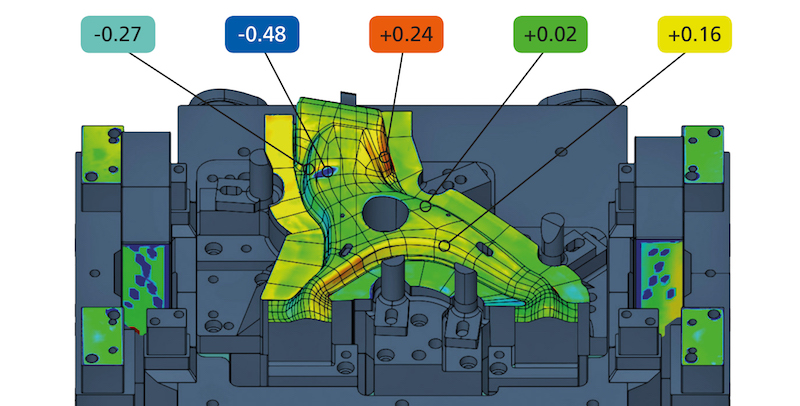 ATOS systems return full-field data about deviations between the actual 3D coordinates and the CAD data of sheet metal parts


