Portable systems have made high-accuracy measurement possible across all plant areas – the next step in this evolution is the integration of metrology with automation
In years past, automotive manufacturers have been forced to choose between very different paradigms in the search to improve the quality, shorten design-to-launch times and better manage the vital production ramp up period in those critical high-demand months following a new launch.
On one side were proven CMM technologies and methods that were mostly used in the measuring room and near-the-line. These were mostly applied to sample parts for measurement, analysis and problem solving. On the other side were in-line process control systems that needed to work quickly to support line cycle times.
Pre-integrated and ready to measure
Hexagon Manufacturing Intelligence’s new automated measurement work cell, the 360º Flexible Measurement Cell (360º FMC) is the first to seamlessly deliver all four pillars of automation in one solution: flexibility, footprint, throughput and performance. The 360º FMC is ideally suited for and aero structure applications and closure panel fabrication to name a few uses.

The 360º FMC solution is built on commercial-off-the-shelf work cell systems integrated with Hexagon Manufacturing Intelligence measurement solutions. This synergy of external devices, products, processes and systems packaged in a COTS format makes these work cells easily customisable and quick to install. The 360º FMC solution enhances the manufacturing process by seamlessly delivering actionable information. With this and other cell designs, parts from multiple vehicle programmes can be inspected.
The closure parts are fixed on a turntable, allowing the measuring robot to reach the exterior class A surface, the inner side assembly, window channel, hemline, hinges and other critical areas. The 360º FMC is scalable, portable and modular. The solution is offered in three configurations, ready for in line, near line or off line applications, and is easily adapted to any production space. Solutions are easily scalable as required by specific part size and measurement tasks. The 360º FMC solution provides an easily adaptable solution for changing manufacturing priorities and production demands. The 360º FMC is easily moved and configured to easily adjust to evolving manufacturing needs of OEMs and suppliers alike.
Meanwhile, the industry saw the development of technologies such as non-contact optical scanners that complemented traditional probing CMMs.
These new non-contact scanners were first used in manual configurations before maturing into semi-automated measuring cells, proving highly useful in various automotive industry applications including prototyping, dies, sheet metal stampings and closure measurements. The industry has also seen a definite shift in approach to quality control in serial manufacturing.
Process innovations and developments in metrology equipment that have moved inspections out of the quality room and progressively closer to the line have resulted in a reduction in the time taken to collect data, obtain information and act to correct issues. Many of these changes are fuelled by innovations on the software side which help deal with the large amounts of data created and put those to best use.
Bringing big data metrology to the bodyshopA recent industrial solution from Hexagon Manufacturing Intelligence stands out as an attempt to solve a long-standing problem that has limited automotive manufacturing efficiency. As industry OEMs and suppliers have been unable to fully integrate the latest metrology technologies within a single in-line workflow, a solution that combined speed, reliability and advanced data capture capabilities would have the potential to redefine the sector.
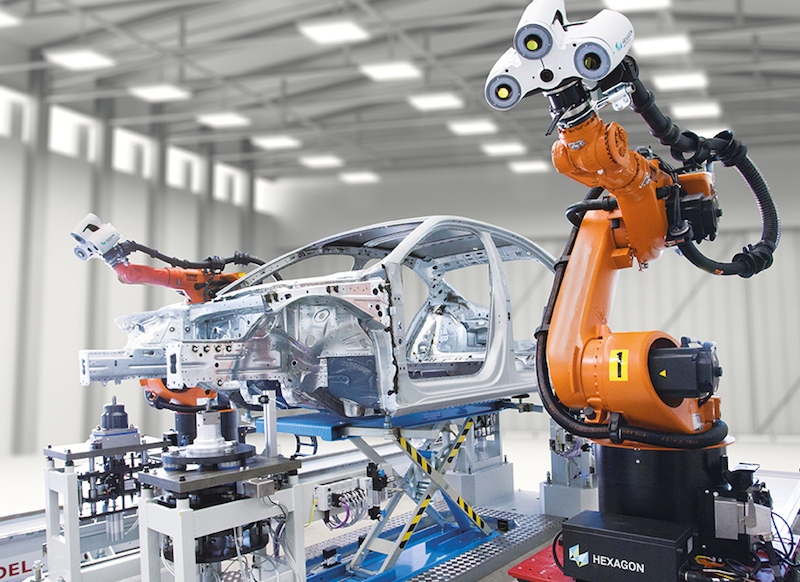
Hexagon’s 360° SIMS system has been developed and designed for just this purpose. An automated 3D metrology and process control system, it is suitable for use either in-line or near the line, as a line bypass or in advanced measuring centres. The system’s fusing of innovative 3D area-measurement sensors mounted on industrial robots powered by advanced software has the capacity to allow customers to develop new, more efficient business processes.
It’s a fast, rich and actionable solution that enables automotive OEMs and suppliers to apply fully-automated dimensional quality processes for sheet metal and body assembly inspections. With 360° SIMS, both production and quality personnel gain near real-time access to full surface and geometry inspection as well as critical feature and point measurements – all directly from the shop floor.
This is a system that handles several long-standing challenges that have faced metrology providers attempting to deliver in-line and fully automated solutions. These include the capacity to measure up to 100 percent of production parts and assemblies across 24/7 operation within demanding production environments, while fully integrating with line automation and control architecture fully in step with cycle time.
These were challenges to which Hexagon were keen to apply their broad technology base and application know how, and the result is a system with the potential to transform the category by integrating metrology with automation and creating an avenue for fast, rich and actionable metrology-based process control.
The 360° SIMS dual robot cell configuration (pictured left) employs 7-axis sliders to give the robots, which carry optical area sensors, access to all critical areas of a car body. Each sensor position is designed to capture an area of up to 50x50 cm, and the system integrates 3D reconstruction and 2D greyscale imagery processing.
 360° SIMS Cell automatically measuring all closure types
Once data is captured it is immediately downloaded and processed. The 360° SIMS software crunches the huge amount of optical data captured into 3D point clouds and other dimensional data, accurately measuring geometries using subpixel technology. This is compared to the CAD design intent or a functional master part.
The system then streams measurement results into the operator interface to support the timely handling of any potential quality issues.
In addition, a more detailed 3D colour map report is automatically produced and made available for further root-cause analysis.
The richness of the measurements and the flexible inspection routines provide excellent support during part development, approval for production, launch and ongoing production process control stages. The system’s operator gets a constant update about the measurement progress and results are available a short time after the data acquisition is complete.
The results offer post-measurement flexibility not commonly available in traditional CMM and process control stations. The data model and tools allow users to further analyse the information collected, add points, cut cross sections, apply secondary local alignments and much more.
Marrying sensing technology with powerful softwareHexagon’s area measurement technology combined with the 360° SIMS software results in a variety of powerful analysis tools including rich colour maps, visual SPC, comparisons, trend charts for large data sets and patent-pending video-of-the-day reports.
 3D measurement of a BIW with colour map
Analysis of measurement results such as surface geometries, edge lines, character lines and cross sections makes it easier to understand the main causes of sheet metal part deformations and any quality issues with assemblies.
The system functionality and benefits extend beyond the boundaries of the cell and the single inspected part; the 360° SIMS system also offers multi-part process control analysis and reporting functionality, as well as integration to the world-renowned Q-DAS SPC software and other functions designed to support smart corrective actions.
Overall, it’s another step towards the digital factory of tomorrow, and integrates Hexagon Manufacturing Intelligence’s most powerful technology offerings within a cohesive whole that can meet customer needs.


