The strategic orientation towards full-field and non-contact optical measuring technology is one of the key elements of Opel’s car body engineering quality assurance

In the future, Opel press shops will be relying on the ATOS ScanBox 7260 – a new, automated 3D coordinate measuring machine for large parts. Sheet-metal parts for all new Opel models will be inspected during ramp-up and production. The stand-out features of the GOM system include high-speed measuring, easy operation, and central programmability via its Virtual Measuring Room (VMR).
Opel produces the Insignia and Zafira at its Rüsselsheim site in Germany, both in a standardised production system. The operation of a standardised quality process for car body quality for new developments and facelifts – from individual sheet-metal parts and welded assemblies through to side panels and bodies-in-white – is the responsibility of Central Quality Assurance (CQA). This department is also responsible for introducing new car body measuring techniques.
Opel introduced technologies for speeding up measuring procedures at the start of the 2000s. The result was the successful installation of automated optical measuring technology for geometry and shape inspection of vehicle parts and components. The strategic orientation towards full-field and non-contact optical measuring technology is one of the key elements of Opel’s car-body engineering quality assurance.
After various systems were compared and assessed using an evaluation matrix, Opel selected 3D coordinate measuring systems from optical measurement solutions experts GOM, based in Braunschweig, Germany. These met Opel’s specific requirements regarding precision, time and cost savings, and above all easy handling. The paradigm shift from tactile to optical metrology at Opel’s European facilities has received endorsement from the Opel CEO himself; Dr Neumann put the ATOS ScanBox 7260 into operation on a recent visit to Rüsselsheim.
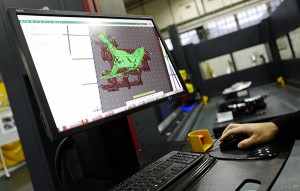 Parts and kinematics are simulated in the Virtual Measuring Room
The newly developed, automated 3D coordinate measuring machine ATOS ScanBox 7260 has been in position in the pressing tool production facility at Rüsselsheim since late 2015. The ATOS ScanBox 726 checks geometry and shape, including hole patterns, trim & spring and hemmed edges, of sheet metal of sheet-metal components up to the size of vehicle side panels directly at the production site. The necessary tool optimisations are then prompted using the measuring results. In contrast with the previously used 3D coordinate measuring technology with its time-consuming alignment and positioning requirements, the GOM software allows flexible alignment of the part to be inspected into the required position.
The new equipment brought about a significant reduction in measuring times and programming work compared with the previous tactile methods. “The measuring procedure has been accelerated by more than 80%. In addition, programming efforts have been reduced from one week with the tactile measuring machine to half a day,” confirmed Dirk Kissinger, project manager for car-body measuring technology.
Reduced programming with Auto TeachingAuto Teaching significantly reduces programming effort. This new software feature, which forms part of the VMR, simplifies the programming of the automated measuring procedure. The key function is the automated path generation: the GOM software generates individual measuring sequences, which the sensor has to carry out as part of the complete measuring procedure, with no manual interaction. Appropriate sensor positions for each feature to be measured are calculated on the computer-aided design (CAD) using the inspection points. This results in an optimised and efficient path of motion for the robot, including the optimal sequence and number of single scans required. Furthermore, the ATOS ScanBox integrates the entire measuring task into the calculation. It automatically allows for any suitable intermediate steps, in case there is a collision risk for the robot, eg with the ATOS ScanBox housing or the part to be measured.
Auto Teaching thus results in a clear shortening of the overall measuring procedure. By automating the programming of robots, user influence is continuously reduced, which in turn raises process security and reliability.
Optical measurement replaces tactile methodsThe introduction of the ATOS ScanBox 7260 represents the next logical step in Opel’s restructuring of its measuring technology. In 2003, Opel bought its first mobile measuring system from GOM for full-field optical 3D coordinate measurement: the ATOS 3D scanner. The high-resolution ATOS 3D digitiser also met the requirements profile of complex components. Existing measurement plans are imported into the GOM software and processed. The results are automatically fed into Opel’s own quality assurance systems via an interface. Additional optical 3D measuring systems have been integrated step by step into the automotive production processes, with the result that Opel’s European sites now use 27 mobile, optical 3D coordinate measuring machines from GOM.In order to make processes even more time and cost-efficient and to further increase flexibility, Opel intends to automate optical measurement, based on its experiences with GOM’s 3D measuring technology. The first automated cell with an integrated ATOS Triple Scan was a project cell with various individual components introduced to Rüsselsheim CQA in 2011, and rolled out for measuring attached parts (boot, doors and trunk lids) in all of Opel’s European body-in-white plants. This required the project management and support team to take overall responsibility for the integration of the system.
“We took over the complete management of the project right through to the plant construction. Every agreement between the bodyshop, the plant engineers and GOM went through us. CQA was also responsible for ensuring that the occupational safety requirements were met, and we were additionally in charge of support and training,” commented Kissinger. “We carried out offline programming in Rüsselsheim, and then drove with the data to the plants, so that we could supervise the initial operation of the measuring programs. At the time, we were only able to cope with the task thanks to the measuring cells’ high degree of standardisation”. A need thus arose at Opel for a complete standardised solution, with a single point of contact, for automated 3D coordinate measuring technology.
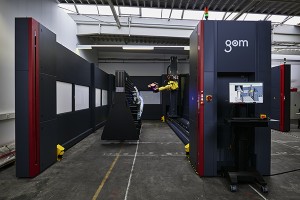 ATOS ScanBox 7260 optical 3D coordinate measuring machine for large parts
A quantum leap for our measurement technologyOpel has been using a standardised, automated 3D coordinate measuring machine from GOM in its press shop in Kaiserslautern since 2014. It examines sheet-metal components during try-out and manufacturing. It is clear within a matter of minutes whether the component is good, or whether any corrections to the stamping tools need to be made. It’s not only the entire measuring procedure, but also the inspection processes that are largely automated, right up to the easy-to-understand inspection reports. The ATOS ScanBox can also be operated by shopfloor workers using the simplified user interface. The complete measuring procedure is simulated without a robot control panel using drag and drop based on the CAD data, without inhibiting the ATOS ScanBox.As opposed to an automated project cell, the ATOS ScanBox comes with all of the elements required for fully automated 3D digitising and inspection. The automated 3D coordinate measuring machine incorporates hardware, software, worldwide customer service, operational safety and documentation. This means that no further planning or coordination effort is required on the part of the automotive manufacturer. Only the infrastructure – floorspace, power connection and network – needs to be provided.
It is particularly important to Opel that one single point of contact is provided by GOM for planning, set-up, training and support. Even the work-intensive safety acceptance testing is considerably simplified by the standardised set-up of the ATOS ScanBox.
The deployment of the ATOS ScanBox 5120 in Kaiserslautern resulted in a significant acceleration of measurement tasks and an increased quality. However, this only applied to components measuring two metres or under. Based on this experience, it was decided that components up to the size of a vehicle side panel should be measured optically, and this has now been achieved with the ATOS ScanBox 7260.
Automated inspection at multiple site.The Europe-wide roll-out of the ATOS ScanBox 7260 is scheduled for 2016. By mid-2017, Opel’s four press shops in Zaragoza, Gliwice, Rüsselsheim and Ellesmere Port will be using the ATOS ScanBox 7260 to check the quality of large sheet-metal parts. Even with the automated, optical 3D coordinate measuring machines being used at various different sites, Opel can control quality management centrally from Rüsselsheim, as the standardised measuring and inspection processes are programmed centrally and loaded into the VMR of the respective ATOS ScanBox. This means that their application at different sites is simultaneously guaranteed – the entire quality assurance is transparent and traceable.


