When it comes to measurement in manufacturing, accuracy is critical. Rick Van Valkenburg, responsible for global sales and marketing at Perceptron, discusses the importance of accuracy when developing robot-based measurement systems for the automotive industry
 How has the request for accuracy in automotive measurement evolved during your time at Perceptron?I have been with Perceptron since the mid 1990s and accuracy has always been a requirement for measurement systems. There are two ways to evaluate accuracy for inline and near-line measurement systems and both are important. The first way is system accuracy. This is the traditional definition that is published by measurement system providers and is the type of accuracy most often used in comparisons. System accuracy is the accuracy of the measurement system throughout the working volume but on an ideal feature such as a sphere, step gauge, or flat plate.

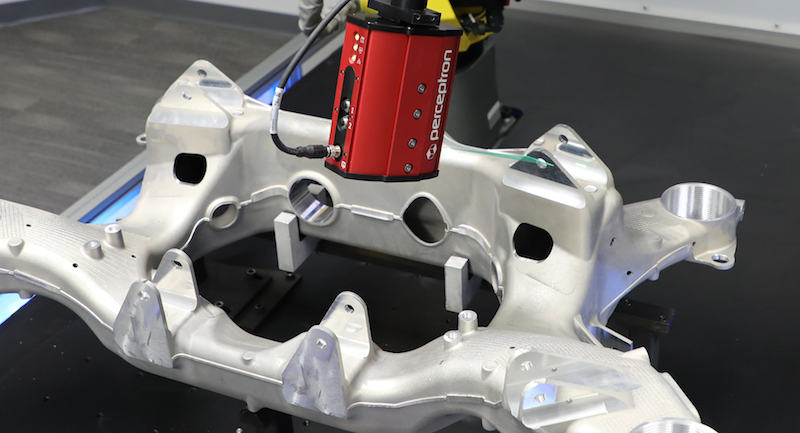
The second way to evaluate accuracy is a combination of feature accuracy and local accuracy. When specifications are evaluated for a measurement system this type of accuracy is often overlooked. Feature accuracy relates to how well a measurement system can measure the specific features found on automotive assemblies. Local accuracy is how accurately the system can report the movement of that feature throughout the range of manufacturing variation. If we think about measuring a threaded hole, it is important that we can measure the hole repeatably and also that we report accurately the hole’s variation or movement from part to part. Automotive parts contain features that can be difficult to measure, such as threaded holes, threaded studs, extruded holes, sub-3mm hems on closures, machined surfaces and others. Measurement systems are a significant investment in quality and if the system can’t reliably measure all the features required by manufacturers, significant value is lost.
Traditionally, inline measurement systems acquire their system accuracy by correlating and offsetting to a CMM. The correlation is carried out with parts that have been measured by both systems. A multi-part comparison allows confirmation that the measurements of both systems track together and allows the inline system’s measurements to be offset to match the CMM. The utility of this method is that it allows the manufacturer to use their CMM as their master. The limitation is that an initial correlation has to be carried out to generate accurate data and then this procedure needs to be repeated on a regular basis for confirmation of stability.
In the early 2000s manufacturers were pushing for accurate systems that did not require correlation to a CMM. This was driven by the increased number of models being produced by assembly plants and the increased burden of correlating the multiple inline gauging systems with the CMM across all of the different models and subassemblies. As robotic measurement became more accepted, Perceptron used a number of methods to achieve this goal. The first method was to improve our in-station sensor calibration. Second, we improved our robot calibration so we could achieve accuracies in the sub-.5 mm range. This method evolved into a static calibration of each robot position with a laser tracker allowing accuracies below .25 mm. At this point we reached the limit of the modern industrial robot’s repeatability performance.
How is Perceptron improving accuracy today?We realised the next step was removing the robot from the accuracy equation. We developed our AccuSite product to track the measurement sensor on the robot, which makes robot performance irrelevant. We achieve accuracies better than .15mm with this technology.This also meant our measurement of features needed to go beyond repeatability performance – our measurement algorithms needed to be accurate as well. The obvious example is the measurement of door fits characterised by gap and flushness. Instead of taking repeatable measurements and correlating to an external device, we have worked hard to make the measurement accurate right out of the sensor. This eliminates complex and time-consuming correlation effort.
Our customers want to measure where they manufacture. Accurate measurement in or near the manufacturing line is the easiest and most cost-effective way to get measurement data on your product and your process. Pulling parts out of the process and transporting them to a temperature-controlled room to be measured is costly and time consuming. This cost is exponential when there is a quality spill and data is needed immediately to decide whether to keep building or contain – there is no time to pull parts for measurement at that point.
One implication of measuring where you manufacture is that the environmental conditions are often not stable or ideal. There can be changes in temperature, weld dust, broken weld tips spraying water, and other environment challenges. Our Helix family of sensors is built for the plant floor with an IP67 rating and sensor-based temperature compensation. There is also system-level temperature compensation enabled by carbon fibre artefacts that allow us to identify and correct for measurement changes due to ambient temperature swings and robot temperature as their motors warm up at the start of production.
How is the market responding to the new products?We recently sold, and are in the process of installing, 24 systems with our AccuSite solution to a key customer in Europe. They are using AccuSite to accurately measure the closures in their manufacturing process. We also introduced this technology at our recent Open House in the US, and received a lot of positive feedback.
What else is driving your product development?On almost every new vehicle programme launch we see the number of required measurement points increasing. Speed of measurement has always been important but it is now a critical enabler to measure more on every part. Since our accuracy has improved without affecting our cycle time, we are being asked to measure more of the critical features typically reserved for the customer’s CMM routine. This alleviates the load on the CMM freeing up time for special studies while still providing accurate data on every assembly and allowing manufacturers to track quality over time.Since our systems are accurate from the start, we are also able to measure sooner in the process – with immediate benefit. At times, the CMM programmes are still being taught during the launch phase. Our goal for every system installation is to be ready to measure as soon as the first batch of parts comes through the line. The customer may build one or they may build ten parts a day during launch, but those early parts are critical and we want to provide the data to verify the build quality and process capability.
This goal has helped us prioritise and develop new software tools to make system installation faster and more efficient. Before a system arrives to the customer site, we have a taught robot path and cell layout, defined locations for fixed sensors, algorithms are programmed based on CAD, and reporting screens are defined. Our goal is to pull as much of the installation as possible off the plant floor and into design engineering. The faster we can provide accurate data during launch, the quicker our customers can get to the first saleable vehicle.
Lastly, how do customers use Perceptron data?There are many different types of users that consume our data depending on their role. For example, a plant manager might need station-level reporting on downtime and total number of rejects. A line supervisor is looking for model-level rejects for line stoppage and overall model quality numbers. The operator is looking at our Measurement Monitor display to make a quick decision on a rejected part – whether to contain and route to repair or continue build. And finally, Quality is looking at overall metrics on build quality and using our root cause analysis tools to pro-actively improve the process.
We have built-in tools to automatically generate reports for each level of interest. The measurement data can also be exported to a network level system for further investigation. A typical system setup includes a monitor at the cell and, in some cases, large display monitors on the finesse deck or in the repair area. All screens have our real-time Measurement Monitor running and refreshing after every cycle.


