With so much emphasis on putting the ‘rapid’ into rapid prototyping, no one wants to spend unnecessary time in the metrology lab waiting for measurement results. Yet quality control results must still be reliable, as the data will be used to shape product designs and help finalise production processes. There’s simply no margin for error.
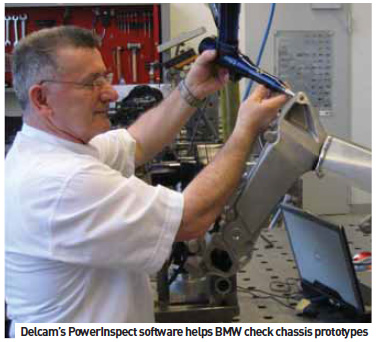
Of course, to eradicate the chance that a dial might be misread or data recorded incorrectly, the way forward is via automated processes, as the BMW Group can testify following its decision to adopt Delcam’s PowerInspect inspection software on two Zett Mess AMPG portable measuring arms now used to inspect chassis prototypes at its motorcycle plant in Berlin.
 PowerInspect is hardware-independent software for the inspection of prototypes and production samples against CAD data. It works with a range of inspection devices, including co-ordinate measuring machines (CMMs) and optical and laser-based systems, but is best known as software for portable inspection arms. Delcam says that by allowing more frequent and faster inspections, and by giving real time results in an easy-to-understand format, PowerInspect allows problems to be identified earlier and corrected at lower cost.
During inspection, the CAD model of the part is displayed on-screen. All results are shown instantly on the model so the user knows immediately that the required point has been measured. This instant feedback also allows the operator to take additional measurements in areas where initial results indicate potential problems.
At BMW, every new chassis prototype is received by the development team as a CAD file. Welding distortions of 3.0mm are typical and have to be eliminated in a continual process of welding – inspection – correction – inspection. In the past, the inspection process for some of the parts could take up to two hours. Now, using PowerInspect, this only takes five minutes.
Innovations deliver alternatives
Portable measuring arms are very much in vogue in automotive plants and it’s an area dominated by technological evolution as suppliers vie for market share. Faro is no exception, having recently introduced CAM2 Measure 10 for its FaroArm, ScanArm and Laser Tracker products. The release marks the first time Faro has included features for collecting and analysing point cloud data as part of its CAM2 line.
Described by Faro as a ‘truly disruptive force in the measurement software space’, CAM2 Measure 10 provides non-contact users with the ability to scan and collect point cloud data for reverse engineering, rapid prototyping and analysis. “Never before has Faro offered a software solution that incorporates measurement by traditional probing methods, scanning and point cloud capture,” says Chief Executive, Jay Freeland.
Other new features, such as ‘Live Colour Scan’, highlight deviations from CAD during the scanning of freeform parts to help quickly identify inconsistencies. Shortcuts allow for the creation of new commands for obtaining measurement data that previously may have only been available through a series of complex operations. This feature enables users to record steps in a measurement process and combine them into a single command that can be accessed later. Other enhancements permit operators to perform remote measurements, run commands and see real-time results from their Apple iPhone or iPad.
Styling and parts
Software for fixed-bed CMMs is also a hotbed of innovation when it comes to automotive product development. CMM manufacturer Wenzel, for example, offers a package for automotive styling studios and toolmakers designed to solve challenges in the design process, ranging from the collection of unknown surface data to milling from either digital or CAD sources.
Typical systems consist of an appropriate Wenzel CMM (such as R-series models), applicable probes and sensors, fixed  or two-axis milling heads, and Wenzel’s DesCAD3D software package. DesCAD3D is a versatile suite capable of performing functions such as: import of CAD data in formats such as IGES, VDAFS, STL and ASCII; measurement of geometric elements; digitising of surfaces, intersection lines and edges; processing of digitised results with different functions; creation or execution of milling programs; offline simulation and editing of milling programs; and export of data.
Typically, Wenzel dual arm R-series machines are used for automotive styling applications. These are robust and can cope with the harsh environment of a modelling workshop or styling studio. According to Wenzel, the choice of probing and sensors depends very much on the application, with the options being solid probes, Renishaw touch-trigger or continuous scanning probes, or laser point or line scanners (up to 40,000 points per second can be collected). Wenzel has supplied a number of R-series CMMs for use at BMW, including the central metrology lab at the carmaker’s plant in Leipzig, Germany. The machines are used primarily for chassis work. Besides defining the machine configuration, Wenzel provided a fullservice turnkey package, taking design responsibility for the laboratory’s foundation, structural analysis and air conditioning to help ensure measurement accuracy of 0.1mm over a 3D length of 6,000mm. The machines have a traversing speed of 865mm/sec, while Renishaw’s PHS heads with continuous positioning allow the user to find the optimal probing position for the defined reference points. Wenzel’s Phoenix optical probes are also deployed.
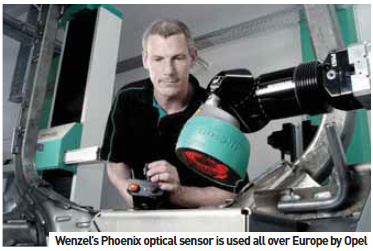
Wenzel’s Phoenix optical 3D sensor uses imaging for the entire inspection task, making it much faster than touch probes. Phoenix was put through its paces by Opel at its headquarters in Rüsselsheim, Germany, where overall measuring time has been reduced by up to 30% during attribute verification. As a result, GM has now installed Phoenix optical sensors at various European locations, including Gliwice in Poland and Ellesmere Port in the UK. It’s a good example of where precision metrology equipment can transfer from product development to high volume production. Another case in point can be seen at Mackay Consolidated Industries, a Victoria, Australiabased supplier of rubber products to the auto industry. The company has installed a ZScanner 600 3D handheld laser scanner from Z Corporation; the system has reduced the time required to inspect hoses for compliance with specifications by 50%.
This Tier one supplier to Ford, GM and Toyota specialises in hoses that carry air into the engine, coolant to the radiator and fluids to the brakes and windscreen. Until recently, the company evaluated specification compliance by manually measuring its products. Engineers used squares and gauges to compare the manufactured product to a 2D printout of the CAD drawing. At one point, the team tried a CMM for inspection but found this required extensive set-up and an absolutely fixed target. The more cramped engine compartments become, the more difficult and time consuming it is to measure these parts with a CMM. Furthermore, neither hand measurement nor CMMs provided documentation support.
This resulted in Mackay purchasing a solution consisting of the ZScanner 600 and PolyWorks point cloud inspection software. The ZScanner 600 takes 18,000 measurements per second with two cameras, providing an XY accuracy of up to 0.08mm and resolution of 0.1mm in the Z-axis.
“We’ve reduced by half the time it takes to scan new hoses,” says Arch Tatas, Mackay’s Quality Manager. “Now, we just place the item on a bench and go to work. This has helped transform our QC procedures to save time, improve quality and increase customer satisfaction.”


