Ducati’s famed Desmodromic valve system allows its engines to reach tremendous speeds but demands absolute precision in machining and assembly
Ducati has realised that the machining of valuable components for its Desmodromic engines must be carefully controlled. Different tools are used hundreds of thousands of times during the course of a year, with the constant risk of a chipped or broken tool being picked up from the magazine, which would result in serious problems. This has been solved using a tool breakage detection system based on innovative noncontact laser technology.
The most important stage of the Ducati Desmodromic camshaft production process is carried out on two Stama machining centres.
The machines work non-stop throughout the year producing camshafts for all the different Ducati engines. Fulvio Abbondi, Manufacturing Technology Specialist at Ducati Motor, says: “Great precision is required when making the shaft, with the rather elaborate machining process carried out entirely within our factory. This is a very expensive component. It is made of a special steel alloy and is already expensive when, as a blank, it reaches the machine tool after its first rough-turning”.
A tool breakage during the camshaft production process would be particularly serious, and could result in scrap, costly re-machining and wasted time. There could also be damage to the machine spindle which, when added to the cost of the specialist tools themselves, would total thousands of Euro.
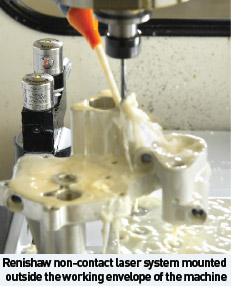
 Abbondi mentions the role played by tool breakage detection. “It is essential that checks be carried out on the work performed by the machines. Renishaw NC4 systems were installed on two work centres. Immediately after a tool is loaded in the spindle ready for machining it crosses the device’s beam at a set height. If the cutting tip is broken, for example and instead of being 100mm long it is 97mm, the laser system triggers an alarm. Clearly, each tool has its own length and diameter, and the system takes this into account when the tool passes through the checking beam.”
He continues: “The NC4 also allows us to check for breakages of small tools used to make keys and other reference points on the cam, which are vital if the engine is to operate properly. If it wasn’t for the Renishaw system, the machine could, for example, operate with a broken cutting tip, with disastrous results. Furthermore, since tools are checked for breakage automatically, one operator can easily manage both machines: all he needs to do is load the pieces and ensure that everything is running smoothly”.
“The first thing we did was to install a system provided by the machine tool manufacturer that enables the power used by the spindle motor to be checked,” continues Abbondi. “This system checks the degree of wear of the larger bits, used to drill the deepest holes, in which the stress during machining is more apparent. If the torque increases it means that the tool is worn and so the alarm goes off. But we also needed to a quick and reliable way to detect tool breakage, even the smallest ones, which usually manage to escape most detection systems.”
Conventional contact-detection systems have certain weak points and are usually unsuitable for small tools.
The tool is brought into contact with a button or rod which activates the device. There is also the danger that the contact itself could break or damage the tool. This means that work can only be done at low speed, which slows down the process and considerably lengthens cycle times. The systems are often fitted inside the operating area, occupying valuable space and causing possible collision risks, not to mention poor reliability due to the fact that they tend to jam.
This is why the Renishaw system was adopted, to replace these devices.
Improvements in laser technology have led to the development of non-contact detection systems, capable of safely measuring ever smaller tools. A laser beam runs between a transmitter and a receiver, fitted on the machine table or mounted on opposite sides of it, so that the beam crosses the operating area. When the tool enters the beam, the amount of light detected by the receiver is reduced, which generates a trigger pulse. If no reduction in light is detected, the system emits a tool-broken signal.


