Bob Evans and Jon Plawchan of Quaker Chemical Corporation discuss some of the crucial performance and quality aspects required in bi-metal crank bore machining
 A highlight of the manufacturing of the crankcase (engine block) is the precision machining of the crankshaft bearing bore. The cylindricity and resulting surface finish for this operation are critical to ensure performance in the engine. The housing is made of aluminium, the bearing caps are often cast iron, ductile iron, or in some cases powdered (sintered) metal.
The tool must machine both materials at the same time with completely different requirements on the machining. The ferrous bearing caps are used to give needed strength and rigidity to the bore and to secure the journal bearings and crank during the high stresses occurring during rotation.
They are actually heavier than a corresponding aluminium cap so they do not provide any direct positive effects on lightweighting. But they do maintain longer lasting smooth operation of the crankshaft and longer life of the journal bearings (because of the higher strength).
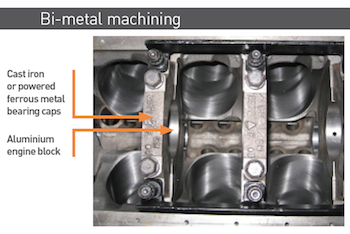 Relative to an all-aluminium part, the reaming of a bi-metal aluminium-powdered ferrous metal component shows significantly higher machining vibrations, higher cutting forces, rougher reamed aluminium surface, poorer reamed hole cylindricity, and smeared metal giving rise to potential galvanic corrosion.
Such problems are largely a consequence of the differences in the friction and thermal properties of the two metals, as well as differences in the nature of their chip formation. Bi-metal machining presents unique challenges with regards to the performance requirements of the metalworking fluid used.
A metalworking fluid used for bi-metal machining operations must effectively reduce friction to maintain stable cutting forces while minimising machining vibrations due to inconsistent or stick slip friction.
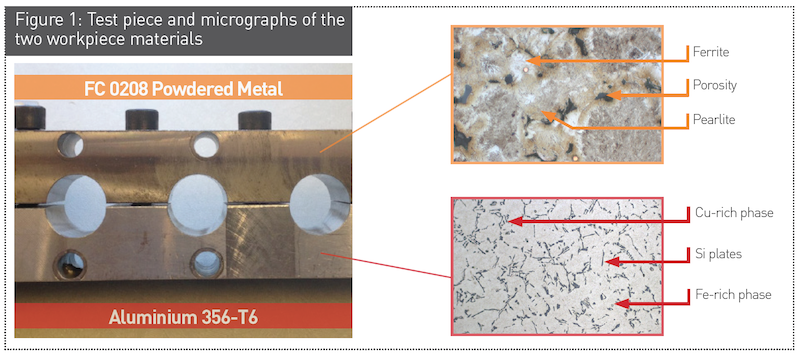
To assess fluid performance in crank bore machining for a manufacturer of engines, a test part was designed to simulate the pairing of a cast aluminium alloy engine block with a sintered powdered ferrous metal (FC 0208) bearing cap. This was to enable the study of the simultaneous machining of these two materials as it may relate to bi-metal crank bore reaming operations. The test part produced and utilised was comprised of a bottom base of Al 356-T6 bolted to a top half of FC 0208 sintered powdered metal.
Holes were drilled equidistant to the centre line of the two parts, and then subsequently rough-finished. This then provided the final test part, which was reamed using a carbide tipped reamer and concurrently studied for machinability. Using this test part, the machining performance of three cutting fluids was evaluated. The test piece, as well as microphotographs of the microstructural features of the two workpiece materials, are shown in the Figure 1.
 For each fluid tested, 0.6562-inch diameter holes were reamed using a 0.671-inch diameter carbide-tipped reamer. Reaming was performed at v = 520 RPM (90 SFM), and f = 4.6 IPM (.009 ipr). The depth for each hole was 1.2 inches. During reaming, the machining vibrations and cutting forces were measured, and following machining, the surface roughness for reamed aluminium and FC 0208 powdered metal surfaces were obtained.
 Machining vibrations and surface roughnessIn the machining of dissimilar metals, the large differences in elasticity, hardness and strength that exist between the two materials gives rise to elevated machining vibrations, or ‘chatter’, that can occur during machining.
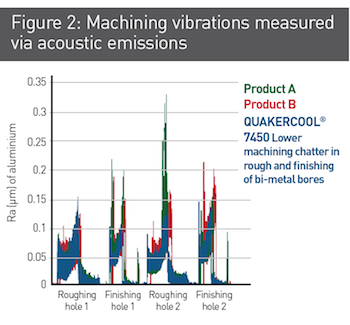
It is likely that high vibrations give rise to machinability problems such as rougher finish, poorer hole form and cylindricity, and accelerated tool wear. The machining vibrations (as measured via acoustic emissions) for the reaming conducted for each of the three fluids is shown in Figure 2.
As seen, Quakercool 7450 reamed with a low and relatively stable level of vibration. In contrast, other products both reamed with a significantly higher level of chatter, especially near the bottom of the hole where AE signals increased rapidly. Such higher acoustic emission signals are typically a result of higher cutting forces, and often greater adhesion between the workpiece and cutting tool surfaces.
Higher machining vibrations and cutting forces, especially in the machining of a bi-metal part, can easily give rise to a degradation of the machined surface finish. Figure 3 shows the surface roughness (as Ra (um), measured for the reamed aluminium surfaces of both an Al-Al and Al -FC 0208 bi-metal part for the three products evaluated.
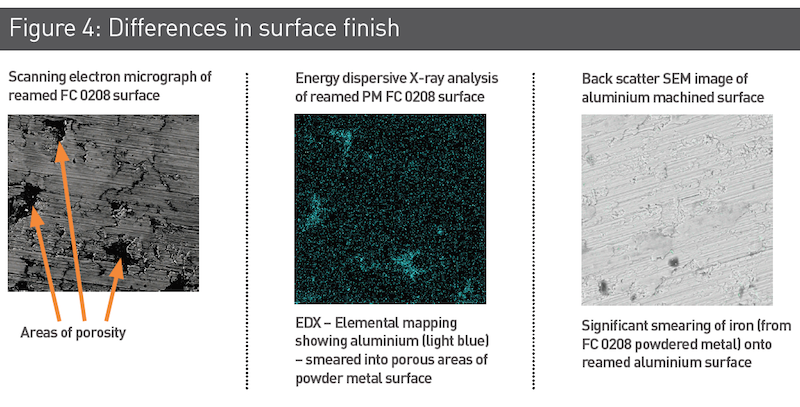
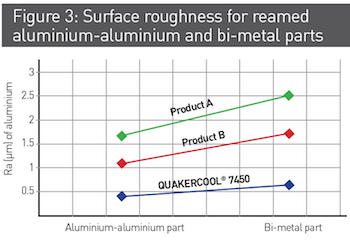 As seen, large differences were observed between the three fluids, Quakercool 7450 consistently reamed to better finish on the aluminium-aluminium surface, and clearly yielded a better reamed finish on the bi-metal surface. These differences in the surface finish are reflective of how the fluid may overcome the inherent porosity of the powdered metal, the build-up of aluminium in these voids and the smearing of ferrous materials onto the aluminium surface.
The transfer of metal that can occur during bi-metal machining can be seen in SEM/EDX analysis of the machined surfaces, (Figure 4).
The results of the tests conducted show clear performance differences between products. The higher level of machining performance offered by Quakercool 7450 is based on the lower machining vibrations and cutting forces measured, as well as on the smoother reamed surface roughness measured on both an aluminium-aluminium as well as an aluminium-powdered metal component.
This suggests that proper cutting fluid selection can have a significant impact on the total cost of ownership for the manufacturing of the crankcase (engine block), particularly the precision machining of the crankshaft bearing bore.