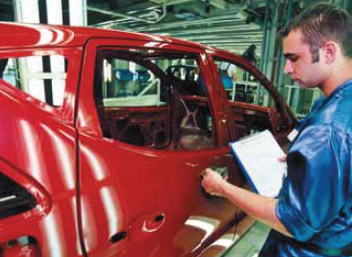
Measurement is a key aspect of maintaining quality in a variety of areas of automotive part manufacture and assembly. As well as physical areas like fit and finish, and gap and flush, quality measurements must also be made in areas such as the paintshop, analyzing the finish and colour to ensure these and other elements meet prescribed standards.
In the September 2001 issue of AMS, paintshop quality came under investigation, particularly from the perspective of booth contaminants; dirt and other foreign particles that could adversely affect final finish.
The problem of foreign material in paint booths had originally focused on decontaminating workers and visitors, with an estimated 60% of paint defects caused by dust particles, lint, hair, cotton fibres and other pollutants brought in by those entering the work area. Solutions for this problem included fitting all personnel entering the booth with lint-free overalls and hair bonnets, together with air showers and occasionally even a shoe scrubber.
 Contaminants could also come from the paint itself.
Agglomerated paint particles, colour carry-over and paint line deposits all affect final quality. High-solid, waterborne basecoat materials cause more problems than low-solid, solvent-borne paints, since they are prone to shear degradation, agglomeration, foaming and skimming.
While there were continuing refinements in the storage and pumping supply systems, emphasis was put on installing cavityfree line products designed specifically for paint. According to ABB Flexible Automation, benefits from such improvements include reduced paint impurities, first-run capability and reduced repair warranty work.
Sensors determine finish quality
AMS anticipated the use of sensors in assessing the quality of final paint finish, noting the benefit of impartial, objective analysis. Of note at the time were two paint quality systems from Dürr, one measuring coat thickness in wet (Ecopaint Checker), and the other the registration of the quality parameters of shade and levelling (Ecopaint Quality) in the dry film.
Coat thickness plays a critical role in the paint application process. From measuring the thickness, inferences can be made on the final surface finish, and colour and gloss of the coated body, either of which can trigger intervention to control or stabilize the process.
The Durr Ecopaint system, installed at Audi’s Ingolstadt production plant in 2000, assessed every coated body with over 700 individual measurement points. The applied coat thicknesses were measured in the wet state within a few seconds of application, to an accuracy of within 2% for a wide range of paint/substrate combinations.
The system offered a very high local resolution, with a measuring distance of 100mm (+/- 20mm), a small measuring spot (2mm diameter), and angular tolerances (+/- 45 degrees). This allowed measurement of curved, bent and difficult-to-reach areas, with a relative measuring speed of 200mm/s.
With the measurement of the coat thickness in the wet state, the Ecopaint Checker can quickly, after a maximum of three car bodies, detect any deviations from anticipated results in the actual paint layer, triggering an immediate alert.
In wider applications for measurement technology, beyond the paintshop, one of the key decisions is whether to use contact or non-contact metrology.
Commenting on the challenge of measuring curved surfaces, Gary Card, Marketing Manager at North American Marketing, noted: “There are more curved surfaces in the world, there are fewer individual pieces of sheet metal in carbodies today, and more assemblies of sheet metal components. Computer-aided design techniques make it possible to fashion sheet metal assemblies into curved, aerodynamic shapes.”
A lot of data is required to define those curved surfaces and according to Card, in 2003, contact measurement was still faster than the non-contact equivalent as the optics used in non-contact measurement can affect the measurement accuracy.
“With a lot of applications, you are talking about surfaces where tolerance requirements are such that non-contact measurement provides just the right balance between accuracy and faster inspection throughout. Environmental issues, such as temperature, also affect the measurements that you obtain from the surfaces.” Whichever metrology methodology was selected, measurement was becoming common at a variety of points along OEM and Tier production lines. Mark Hoefing, Director of Sales and Marketing for Perceptron, based in Michigan, pointed out that more measurement can mean less scrap and so less capital expenditure. Perceptron produces only non-contact measurement solutions “Our systems have always been non-contact,” explains Hoefing.
“The alternative is to use coordinate measurement machines (CMMs). These would be used in a CMM room or in the CMM office, and parts would be measured by contact probes. These probes would then give the measurements in three dimensions.”
In many areas, measurement cost was an issue, as noted by the Optical Sensor Interface Standard organization. Commenting on high integration cost, it stated: “The wide variety of available (systems) sensor principles, and the missing guidelines and standards for integration of these systems, poses a high technical and financial risk.”
Where a large proportion of metrology equipment used in automotive production was fully mobile within the cell – and only within that cell – a product released in 2007 showed there was a market for added flexibility in measuring mobility.
One of the first portable metrology measuring systems was made by Tokyo Boike and underwent tests at Nissan’s Sunderland, UK plant. In fact, it was so new that while it had been tried in a series of different areas, plant engineers had yet to decide where it should ultimately operate. “At the moment, we’re trying it on everything,” was one engineer’s comment.
At time of publication in 2008, the unit was attempting to solve a problem where front light clusters would crack during installation on the line. A test was initiated to assess the bodies for correct alignment, during which quality assurance personnel scanned the light bed on the body-in-white. The scanned image would be compared with a stored CAD image to identify any imperfections.
“We want to see if there are any major differences in the shape of the body that might cause stress areas on the headlamps,” said Dave Bambrough, an engineer with Nissan Manufacturing UK’s quality assurance measurement team. Nissan also used the technology in Japan, where distortion in some doors was so bad that once installed, they could hardly be closed.
Using these measurement techniques, the problem was fixed at the process stage and eliminated.
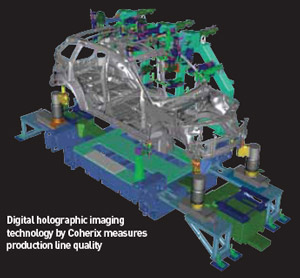 The next step for metrology could be digital holographic imaging, with technology developed at the University of Michigan primarily to test transmission and chassis components. Dwight Carlson, Chairman of technology company Coherix (and former CEO of Perceptron), describes holographic imaging technology as ‘disruptive innovation’.
“Major product breakthroughs are always preceded by a major breakthrough in manufacturing process capabilities. And these are preceded by major breakthroughs in metrology.”
According to Coherix, new holography tools will help manufacturers to achieve tolerance levels of two microns, dramatically reducing defects and improving warranty performance. Up to that point, most parts had been produced with tolerances of +/- 12 microns.
Coherix’s ShaPix is a surface data tool that uses tuneable wavelength lasers to illuminate surface areas. When paired with optical equipment and software, together they produce threedimensional part images in under three minutes – considerably faster than coordinate measuring machines which can take several hours, depending on the number of point measurements and part complexity.
“Analogue measuring takes data one point at a time,” commented Tom Weber, an industry analyst. “Digital holographic imaging... takes and measures one million points at a time. It’s so big, it’s mind boggling.”
Adoption of the technology has been slow, though this was attributable to existing contracts and equipment already being in place, rather than technologists being uninterested in improving part inspection quality and speed.
Flexibility and speed have been the unchanging goals of measurement solutions over the last decade. Motion of the measuring heads has steadily improved, with fewer cameras online carrying out the work of what were previously multiple-camera systems.
Speed has been critical, yet increased image quality (allowing better analysis) was always balanced by the computing power needed to analyze millions of individual points. Digital analysis of parts and the BIW will do a lot to increase the speed of measurement, so that added quality in the final product can justify the capital investment.


