Automated, non-contact measurement solutions seem to be the way forward for automotive manufacturing
Automotive plants require a variety of cell configurations for robotic 3D metrology and process control. Typically, such solutions will be based upon key components that include: industrial robots as flexible sensor positioning platforms; non-contact, white-light sensors; a software suite for delivering actionable measurement results to different user communities throughout the plant; integration to line automation, automation devices and plant control; and tools for large data set and colour map visualisation and reporting.
Challenging geometries and assembly features require robust measurement capabilities. Among the solutions is Hexagon Metrology’s 360° SIMS end-of-line body-in-white (BIW) gauging cell, which measures the body’s exterior and interior areas. Released earlier this year, 360° SIMS can also be adapted to other measurement tasks on the production line, such as underbody and closure measurement. According to Hexagon, by using a simple touchscreen interface, operators with basic training can supervise the measurement process, visualise results and identify root cause for quality concerns.
Hexagon’s white-light sensors can acquire both surface and feature data. With rapid shot image acquisition, dimensional data is collected and analysed in real time. If required, additional fixed sensors can be added for measuring hidden or isolated critical points on the car body. Cell configurations can include in-line, near-the-line and off-line options to support a variety of customer applications throughout stamping, bodyshop and final assembly sub-plants. Ultimately, the BIW does not have to be brought to the measurement device.
Giacomo Barilà, head of Hexagon’s automated solutions, describes 360° SIMS as “a huge step towards the digital factory of tomorrow". He adds: "We’ve created a fully automated high-speed system that provides new insights into quality for automotive OEMS and tier-one suppliers.” According to the company, analysis of early implementations shows that customers are noticing significant improvements in efficiency, faster problem resolution and higher usability of the measurement data. Apart from these and other capital and operational savings, customers also expect 360° SIMS solutions to offer greater flexibility in measuring multiple models, and easy product updates with even shorter times between new models.
Fully automated metrology Tal Vagman, director of product strategy at Hexagon Metrology believes that fully automated metrology inspection is the next big market driver. “In the automotive sector, the ground is set for the next step in innovation: expanding from automated, off-line and near-the-line solutions to in-line, fully automated and integrated solutions."
He continues: "Clearly, the metrology domain is expanding towards automation and shopfloor operation, and this introduces new challenges and opportunities. In the automotive industry, we see good potential for this trend to strengthen and for more measurement and process control applications to be carried out in an automatic manner in the next few years.”
So what are the challenges facing in-line metrology, and has the acceptance of such solutions improved over the past few years? “The in-line metrology domain is actually rather new and still forming,” says Vagman. “Recent state-of-the-art solutions have focused more on process control, production monitoring and robotic guidance. What we see is that customers are no longer satisfied with only comparing results and using local or partial measurements. They wish to have a primary 3D measurement system working in-line, near the line and off-line where needed.
"New technologies previously only used in product development and measuring rooms, such as white-light area scanning and point cloud analysis, have evolved to be introduced to shopfloor production environments. In-line metrology could actually win wide acceptance because it supports in-line process control, quality assurance and problem-solving, all in one. Due to the nature of serial production with short cycle times and complex geometries, the automotive industry is likely to be the main adopter, especially in the sheet metal, bodyshop, final assembly and powertrain departments.”
Among those exploiting the benefits of white-light 3D optical measurement solutions is Honda’s Swindon plant in the UK, where a Cognitens WLS400M system from Hexagon is being deployed on the Civic model. According to Honda, the WLS400M now carries out a root cause analysis in one shift instead of several days, and measurements that used to take 1.5 hours are now completed in 15 minutes. By using the Cognitens white-light scanning system, the team at Honda is able to focus on specific areas and speed up root cause analysis of any imperfections in the development phase. The objective is to optimise fit and finish before mass production starts.

The Cognitens WLS400 sensor works by projecting a random pattern on the object and triggering simultaneous capture of the area of interest by its cameras. It scans a 0.5 sq.m area and measures full surfaces, features and edges that are not possible for other systems. The data is captured in milliseconds, meaning that the system is suitable for shopfloor environments because vibrations and different light conditions will not affect the measurement.
With all BIW assemblies, the locations of holes, slots, studs, welding lines and other features need verification, not to mention flush and gap checking for door or hinge lines in the trim and finish section. Such critical measurements are performed primarily by either horizontal-arm co-ordinate measuring machines off-line, taking significant extra time, or on the production line, requiring dozens of sensors aimed individually at each feature to be inspected.
Raiding laser capabilities
The Laser Radar from Nikon Metrology claims to provide another alternative to the shortcomings of traditional inspection methods. The device uses a focused laser, controlled by azimuth and elevation drives. To perform a measurement, Laser Radar only needs a fraction of the laser signal to be returned. According to Nikon, this gives it the ability to measure almost any surface, including highly reflective bare body panels, shiny painted surfaces, and even transparent headlights, which are notoriously difficult to measure with typical line scanners.
Such robust measurement ability means Laser Radar can be used for both BIW in production and flush and gap inspections in trim and finish. Laser Radar also has a large measurement range (up to 50 metres), allowing it to measure objects the size of cars, trucks and other large vehicles or components. In essence, Laser Radar is a programmable, contactless measurement system with a declared accuracy of <0.1 mm over the volume of a car. It can be fully automated to measure holes, studs, bolts and numerous other features from a large stand-off, thus eliminating any risk of crashing into the vehicle.
Measuring up to 2,000 points per second makes Laser Radar suitable not only for feature measurement, but also for surface scanning. For in-line inspection, Laser Radar units are mounted to six-axis robot arms located on each side of the production line. Alignment points on the vehicle or pallet are measured automatically. This occurs each time the robot moves the Laser Radar, guaranteeing that all measurements are collected in vehicle co-ordinates and that measurement accuracy is independent of each robot's positioning ability.
Interaction of the Laser Radar, robot and analysis software are fully integrated; inspections are automated and do not require manual intervention during run time.
What exactly is augmented reality (AR) according to today’s standards? And why is AR so interesting to the automotive industry? In literal terms, AR is an ‘enhanced reality’, where a user’s personal perception of reality is overlaid on to a computer-generated virtual reality. It supplements a user’s perception by offering digital information that relates directly to his or her real perception and allows for real-time interaction.
“For users, AR is the interface of the future, allowing for unprecedented real-time interactions with data from every area,” says Jan Witkamp, senior sales manager, engineering solutions at Metaio, a software firm specialising in AR technologies.
CAD data, for example, which is stored on servers, is placed into the correct context for development. Using AR, it would be possible to examine and check the entire engine and all its components in a real yet empty engine compartment. Witkamp believes that this example highlights the significant value of the technology: “The right data is placed into the right context at the right time.”
Metaio is working with Faro to develop exactly this kind of specific application solution, built on the FaroArm portable measuring platform. Leveraging Metaio Engineer software for industrial AR applications, a calibrated camera has been linked with a FaroArm. The camera’s position is constantly and precisely calculated during tracking. This maximises the accuracy of the AR application, which brings numerous advantages in terms of quality assurance.
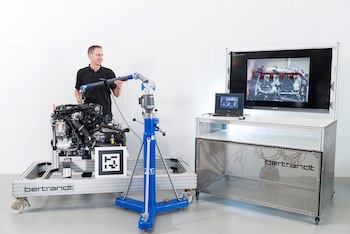
Jörn Thaute, head of engineering services validation at Bertrandt in Wolfsburg, provides an example: “Let’s take a braced fuel line on the underbody of a particular prototype vehicle. Without augmented reality, the development process would have to involve several personnel: a measurement engineer, a design engineer and a DMU specialist.
"Using AR saves time and keeps costs down. The measurement engineer aligns himself or herself with the vehicle and can visualise any deviations between the data and reality in real time. Any errors in the positioning of fasteners, for example, can be resolved quickly.”
3D sensor technology
Zeiss also offers a solution in this technology area: the AIMax digital 3D sensor, which it claims is the benchmark for robot-based 3D in-line metrology. "The benefits of the Zeiss AIMax are particularly evident for complex geometric features such as boreholes, screw threads, or gap and alignment," says Michael Scheffler, product manager, Zeiss Industrial Metrology. "However, the principal highlight is the combination of three measuring principles. The advantages for the customer include multi-line triangulation, grey-tone image processing in 3D measuring results, as well as shadow evaluation, which is particularly important for the fast, reliable measurement of bolts.”
Zeiss AIMax is used primarily for car body measurement. Digital camera technology with high resolution and illumination control for optimal lighting enables contrast rendition of the evaluated features. According to Zeiss, screws or nuts lying under sheet metal are clearly visible, for example. Furthermore, early warning systems from trend recognition mechanisms reduce the number of rejected parts and reworking.
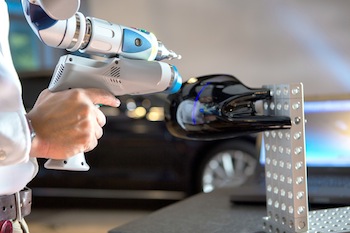
The system combines Faro’s new Laser Line Probe HD and the Faro Edge measuring arm to deliver rapid point cloud collection. The new functionalities enable users to scan across diverse surface materials regardless of contrast, reflectivity or part complexity, and without any special coatings or target placement, says Faro.
The extra-wide scan stripe and fast frame rate boosts productivity by increasing coverage and reducing scanning time. Intricate components can be captured in fine detail as a result of the 2,000 actual points per scan line. In addition, Faro says that users can reduce the required training time with the new crosshair feature and existing LED Rangefinder functionality, which provides real-time scanning feedback.
Faro Edge ScanArm HD can be used for product development, inspection and quality control, and offers capabilities such as point cloud comparison with CAD, rapid prototyping, reverse engineering and 3D modelling.


