Quality 4.0 in car body inspection

Nikon’s Laser Radar – a next-generation CMM that provides accurate, point cloud-based feature measurements in absolute coordinates – generates more data, leading to higher-quality products, and also saves time and money for OEMs

High-end manufacturing has always required the feedback of reliable measurements to adjust parameters precisely and keep components within tolerance. The better and more regular the data provided, the more tightly a production line can be controlled.
Nikon’s Laser Radar technology, which is capable of providing fast, automated, accurate, absolute measurements, clears the way for faster feedback of quality information, leading to exceptional levels of accuracy, high manufacturing efficiency, reduced rework and less scrap.
At the heart of Quality 4.0, a subset of Industry 4.0, is the interconnection of inspection and production. The goal is to enable manufacturers to make better products at lower cost, speed up their response to changes in demand, shorten time to market and achieve greater competitiveness. This is especially true in car plants, where the increase in quality and repeatability is effective not only in production, but also in prototyping and ramp-up phases, leading to a much shorter time to market for a new vehicle.
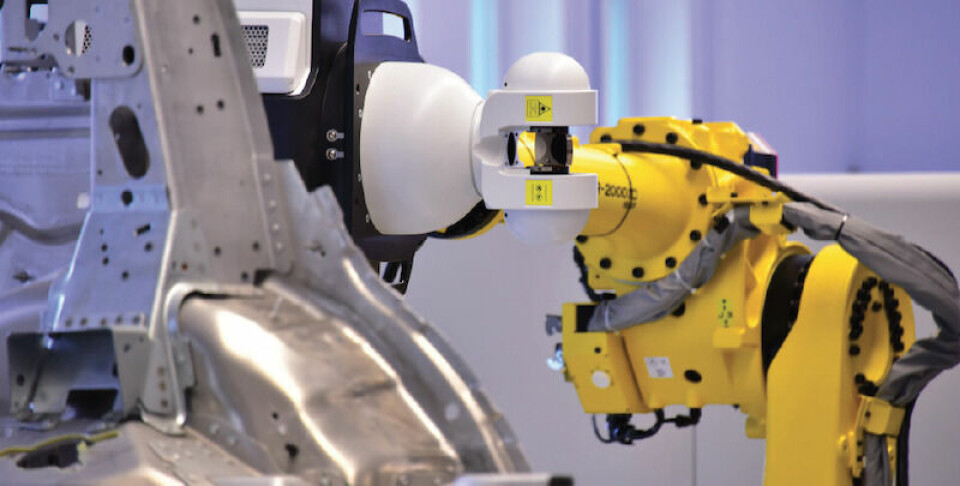
The key is to challenge the traditional concept of in-line, relative sensors – correlated and backed up by horizontal arm CMMs in a dedicated measurement room – and replace it with a shop floor-based inspection solution, providing high-accuracy, absolute data, such as Nikon’s Laser Radar, a next-generation CMM that provides accurate, point cloud-based feature measurements in absolute coordinates. Used directly on the shop floor or in the measurement room, it provides quality information many times faster than a traditional CMM, greatly improving measurement productivity.
A twin robot-mounted Laser Radar system in the production line performs full, accurate, absolute measurements in minutes. There is minimum disruption to the sequencing of production and no need for manual movement to a CMM room. Off-line, the same system can be used as an alternative to a CMM, allowing complete BiW (body-in-white) measurements in less than two hours, compared to up to eight hours for a conventional touch-probe CMM.

Laser Radar takes specific point cloud data at 500 points per second with CMM accuracy – and without the need for any specific part surface preparation. Individual holes and slots in sheet metal can be measured in less than three seconds, with specific surface points (vectors) measured at a rate of over three per second. Even traditionally troublesome features such as studs can be scanned and measured in seconds.
Off-line versus in-line quality control
The move from an off-line metrology strategy to an in-line one is a challenging jump. Traditional CMMs are a trusted, well-known technology, providing the master reference for all measurements throughout production. Traditional in-line measurement systems (fixed or robot-mounted scanners) are a fast way of getting relative measurement data from every car going down the line. So, as one large automotive OEM asked, why change? Using CMMs and traditional in-line inspection solutions, it was a struggle to achieve its goal of a faster quality ramp-up in pre-production and break through a barrier into very high-performance dimensional quality during production.
Implementation of traditional CMMs was costly and effective throughput was low. The first process adjustments were carried out based on very little CMM data, so iterative changes were constantly needed, as a result of a lack of complete and relevant feedback information. With the relative in-line measurement system, they were able to acquire a lot of data, but they could not make it fully functional until after production started. Also, much of their sheet metal and other hang-on components were bought in and limited detailed evaluation was carried out in-house.
Optical inspection as paradigm to increase productivity
The company was insistent upon adopting optical inspection, moving away from tactile probing. Additionally, it wanted to remove the bottleneck of the off-line CMM room to make a paradigm change, in order to achieve breakthrough improvements.
The ultimate goal was better metrology performance, yielding faster feedback of data during the initial phases, before a new vehicle enters full production. Laser Radar was the solution to achieve this.
Laser Radar was implemented in two key areas:• Shop-floor: in-line and bypass measurement cells were installed in the production line, to give absolute measurement data right from day one of pre-production. This allowed them to measure 50% of the bodies produced in pre-series (in previous launches less than 10 were measured) and fewer adjustments are needed during full production to maintain tolerance.• Off-line: Laser Radar on lift and rotate cells was installed to perform component, sub-assembly and full body checks in the CMM room. Multiple turntables can be tended from a single Laser Radar, reducing measurement dead-time while loading or changing fixtures, optimising productivity and reducing the traditional CMM room bottleneck.
The ability to provide accurate, absolute in-line measurements also helped to significantly reduce the pre-production time. Also during production, the highest levels of quality are achieved and maintained, due to the amount of good-quality measurement data directly from Laser Radar cells at the production line. The number of features measured in-line has gone from 190 (relative measurements) to 1,500 (absolute measurements) achieved through a sampling measurement strategy and automatic bypass stations, resulting in precise process decisions down to 0.1mm.

An important advantage is the ability to measure studs. Previously, approximately 20 of the 300 studs on a car were measured in-line. Now, with the Laser Radar, all 300 studs are measured using a sampling strategy, four times per day, without the need to move the car body to a separate CMM room. This has allowed the creation of an automatic correction process for the stud application robots, feeding back the errors to correct in almost real time.
Conclusion
With low production rates during pre-series, Laser Radar enables inspection all of the points on a car in-line to the same standard as on a CMM, generating many times more data than before. This allows much faster ramp-up to higher-quality products, saving time and, ultimately, money.
Using the same technology, the off-line facility ceases to be a bottleneck, due to faster acquisition of more features. Parts do not need to be moved to the CMM room for systematic measurement, only troubleshooting, relieving sequencing issues and improving measurement productivity. Having the same program running off-line and in-line produces consistency of results. Set-up is quicker, as is programming, increasing throughput and reducing bottlenecks.
Taking measurements in absolute coordinates using Laser Radar technology, together with enhanced data collection and reporting, is ideal for integration into a digital manufacturing environment. It allows the advantages of Quality 4.0 to be leveraged, with ‘big data’ used to control the process better and to compare information over time, facilitating enhanced insight, improving decision making, and speeding product development.


